Before an online store can run Google Ads, four things have to exist and be linked in the right order: a Google Ads account with billing, a Merchant Center account, a product feed and a link between the two. Here's the order we'd do it in on Shopify, WooCommerce or any other shop system, what happens once you connect Bavian, and the CSS saving for stores in Europe.
You've built the store. The products are in, the checkout works, and now you want Google to send you buyers.
If you've never run Google Ads, this is where most store owners get stuck. Not because any single step is hard, but because a few accounts have to exist in a certain order, and Google's own screens don't tell you which one comes first.
This guide does. It applies to any shop system. Where the screens differ, we show Shopify, WooCommerce and a plain feed URL. Four things are yours to set up, once. After that, Bavian does the rest.
The short version
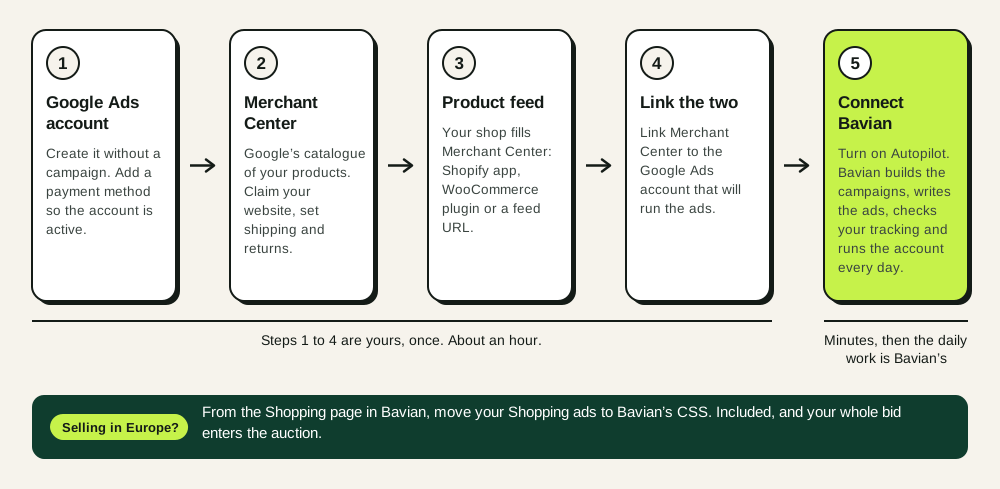
- Four things, in this order: a Google Ads account with a payment method, a Merchant Center account, a product feed that fills Merchant Center from your shop, and a link between Merchant Center and Google Ads.
- Then connect Bavian. It builds your first Search and Shopping campaigns, writes the ads, checks your conversion tracking and runs the account every day, for a fixed $150 a month.
- If you sell in the EEA, Switzerland or the UK, move your Shopping ads to Bavian's CSS. It's included, and it puts your whole bid into the auction.
Why the order matters
Shopping ads, the product ads with a picture and a price at the top of Google's results, are built from your product data, not from keywords. That data lives in Merchant Center, and Merchant Center gets it from your shop through a feed. Google Ads can only show Shopping ads from a Merchant Center account it's linked to.
So each piece depends on the one before it. Start in the wrong place, and you end up with a Google Ads account that has nothing to advertise.
Step 1: Create the Google Ads account and add billing
Go to ads.google.com and sign in with the Google account you want to own the ads. Use a company login, not an employee's private one, so the account stays with the business.
Google's sign-up flow pushes you to create a campaign straight away. Look for the option to create the account without a campaign. A campaign made in the sign-up flow is usually a Smart campaign with Google's defaults, and if you connect Bavian later it takes that campaign over instead of building its own Search campaigns from scratch.
Then add a payment method under billing. Until billing is set up, the account isn't active: ads can't run, and Bavian shows Your Google Ads account isn't active and won't connect to it.
Google may ask you to verify who's behind the account, with company documents or an ID. Do it when asked. And if Google asks for a passkey when you later connect a tool, What is a Google passkey? explains how to set one up.
Write down the account's ten-digit customer ID, shown at the top right in Google Ads. You'll need it in step 4.
Step 2: Create Merchant Center and claim your website
Merchant Center is Google's catalogue of your products. Create it at merchants.google.com with the same Google login.
Google asks for your business name, your country and your website, and then needs to verify that you own the site. The shop apps in step 3 can do that for you, or you do it yourself with a tag or a DNS record.
Before you add products, give Merchant Center what it checks a store against: contact details that are easy to find, a working checkout, all costs shown before purchase, a return and refund policy, and shipping rates for every country you sell to. Set shipping and returns in Merchant Center, and the rest on your site. A store that skips this gets products disapproved, and nothing you do in Google Ads can fix that.
Step 3: Connect your product feed
The feed is how your products, prices and stock get from your shop into Merchant Center, and stay in sync when they change. The principle is the same everywhere: one feed, updated at least daily, with the same prices and stock as the site.
Shopify. Install the Google & YouTube app from the Shopify App Store and connect your Google account. The app creates or links Merchant Center, verifies the site, syncs every product in your online store and keeps syncing when a product changes. Choose the countries to sync to; each one has to be a Shopify market with shipping rates. We go through the Shopify setup in detail in Starting Google Shopping from scratch: Shopify, Merchant Center and Google Ads.
WooCommerce. Install the Google for WooCommerce plugin, formerly Google Listings & Ads. It connects your Google account, creates or links Merchant Center and syncs your products.
Magento, Shopware, PrestaShop, Wix, Squarespace and everything else. Most shop systems either have a Google channel built in or export a product feed as a URL. In Merchant Center, add a data source with scheduled fetch, paste the feed URL and set it to fetch daily.
Whichever way you go, give each product a unique identifier: the GTIN, the barcode number, where the product has one, or else the brand and the manufacturer's part number. Then open Merchant Center and look at the products' status. A product Google won't show can't sell, however good the campaign is.
Step 4: Link Merchant Center to Google Ads
In Merchant Center, go to settings, then linked accounts, and add your Google Ads customer ID from step 1. If you're an admin of both accounts, the link is approved straight away. Otherwise, an admin of the Google Ads account approves it there. The Shopify and WooCommerce apps can make this link for you during their setup.
The link has to be to the Google Ads account that will run the ads, not an old test account from years ago.
That's the foundation: an account that can spend, a catalogue of your products, a feed that keeps it current, and a link between the two. It's also where most do-it-yourself guides hand you over to the hard part: choosing among Google's ten campaign types, writing the ads, picking a bidding strategy, setting budgets, tracking sales, and then checking the account every week while Google changes the rules. We counted 280 changes to Google Ads and Merchant Center in one year.
This is the part Bavian does.
Step 5: Connect Bavian and turn on Autopilot
Go to bavian.com, start the free plan and connect the Google Ads account from step 1, with the login that has admin access to it. Set the project up as an online store and connect the Merchant Center account from step 2. Bavian checks that it's linked to the same Google Ads account, and imports the feed from step 3. Connecting only reads your products.
If the Google Ads account is new and empty, there's no analysis to wait for. Bavian shows a plan for what it will build: a Search campaign for what you sell, a Search campaign for your brand, and a Shopping campaign for your products. You confirm the countries your ads should show in, set your daily budget, and turn on Autopilot. From there:
Bavian builds the campaigns and writes the ads. Search ads from what your website says, with sitelinks and callouts, and Shopping campaigns from your feed. It chooses the bidding strategy and keeps keywords, negatives and budgets in order, once a day, every day.
Bavian checks your conversion tracking. Google Ads has to know which clicks turned into orders, and most new stores haven't set that up. You don't need to solve it before you start. Once Autopilot is on, Bavian checks the tracking, tells you on the Agent page what's missing, and its Conversions page creates the code you need and tells you where to put it. When the first sales come in, Bavian learns from them and moves budget to what sells.
Bavian fills the gaps in your feed. Attributes Google asks for that your feed leaves empty, such as colour, size, gender and age group, are added through a supplemental data source in Merchant Center. Your titles and prices stay as they are.
You keep control. A few bigger steps wait for your yes, such as removing a campaign, and you can set the agent to Approval mode so that everything does. What is the difference between Approval Mode and Autopilot? explains the two.
The price is $150 a month excluding VAT, whatever your ad spend. Google bills your ad spend separately, to the payment method from step 1. Bavian takes no share of it.
Step 6: If you sell in Europe, move to Bavian's CSS
This step only applies if you advertise in the EEA, Switzerland or the UK. In those countries, every Shopping ad is placed by a comparison shopping service, or CSS. If you never chose one, yours is Google Shopping, Google's own.
The difference is what happens to your bid. In the EEA, Google Shopping deducts what Google calls "a fixed percentage margin" from every bid before the auction starts. Google doesn't publish the figure. Industry estimates put it at around 16–20%. Through a CSS that keeps nothing, your whole bid competes.
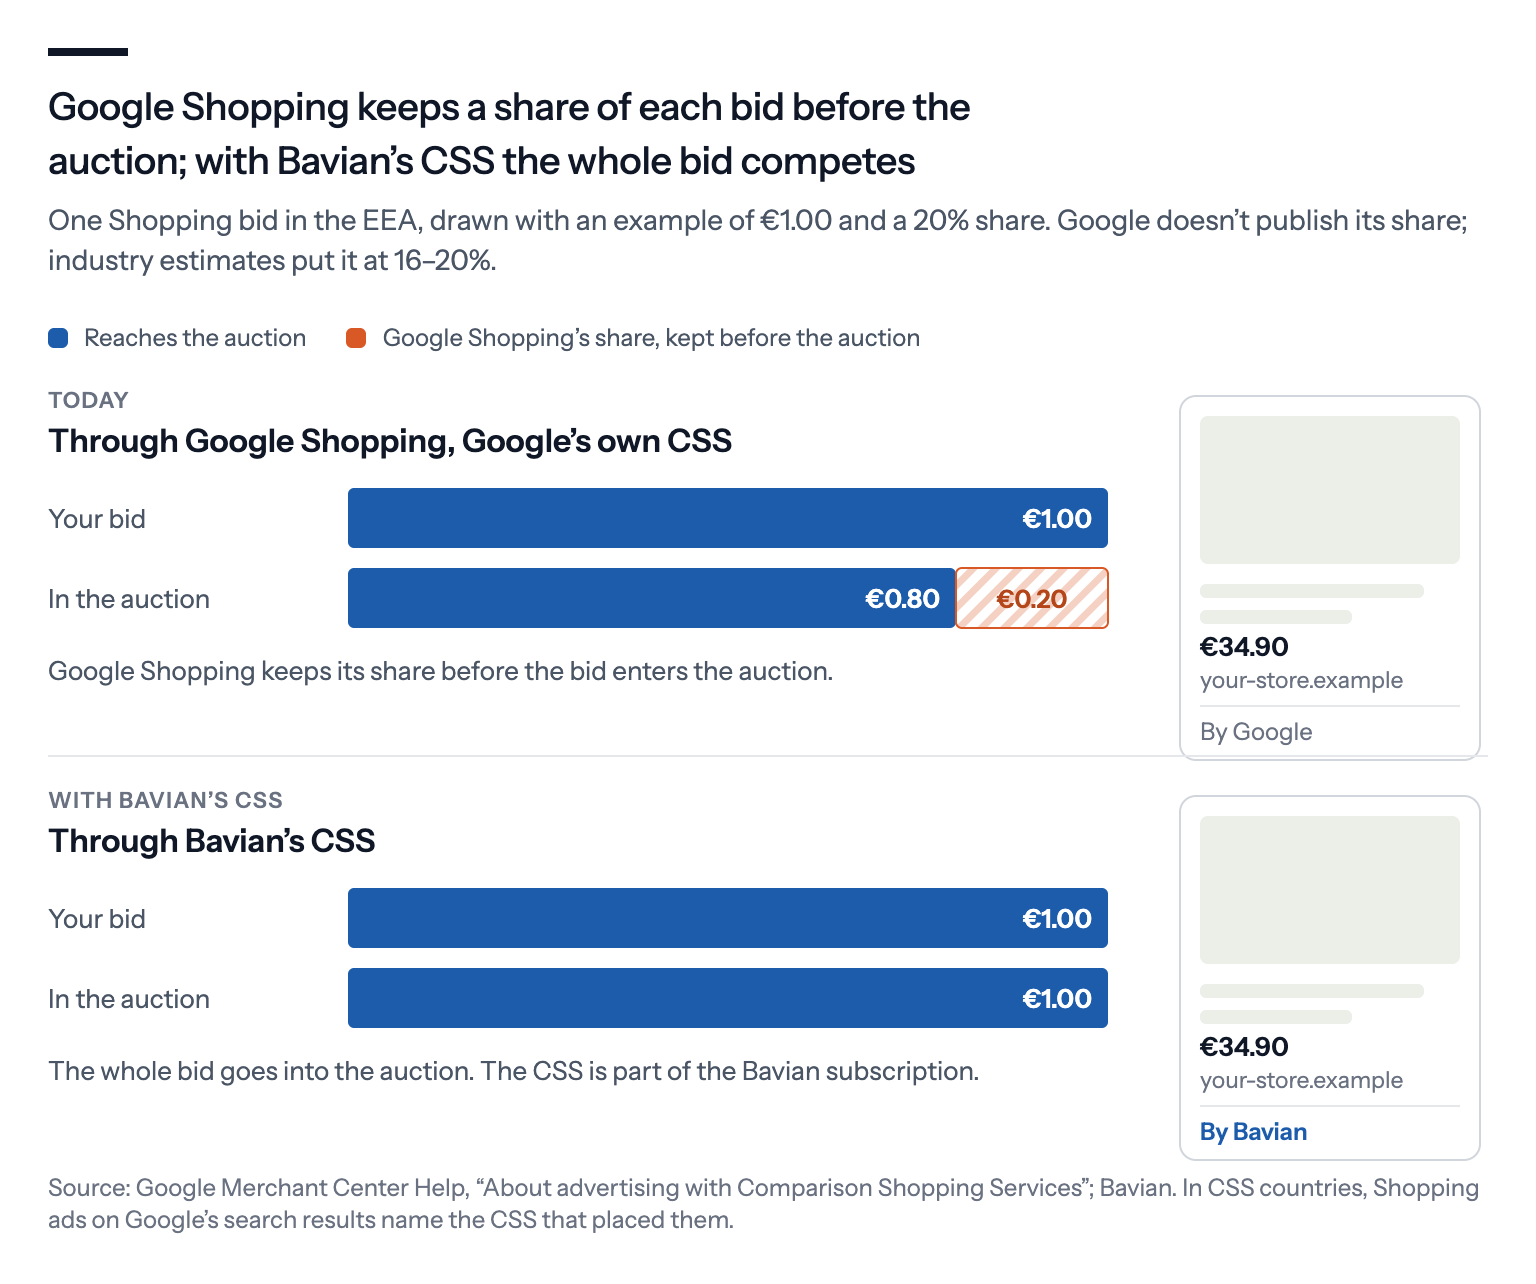
Bavian runs its own CSS. It's included in the Autopilot subscription, and your feed, products, campaigns and Google Ads account stay exactly as they are. Once Autopilot is on, open the Shopping page in Bavian, click Move to Bavian's CSS, and approve Google's email in Merchant Center. The move takes effect within about 14 days. Afterwards, the small link under your Shopping ads says "By Bavian" instead of "By Google".
What the saving looks like
It isn't a line on your Google invoice. It's more weight per euro in the auction, or, seen the other way, the same clicks for less.
If Google Shopping keeps 20% of a bid, a €1.00 bid enters the auction as €0.80. Through Bavian's CSS the same bid enters as €1.00, so it counts 25% more. In theory, the money that buys 100 Shopping clicks through Google Shopping buys about 119, 122 or 125 through a CSS that keeps nothing, at shares of 16, 18 or 20%.
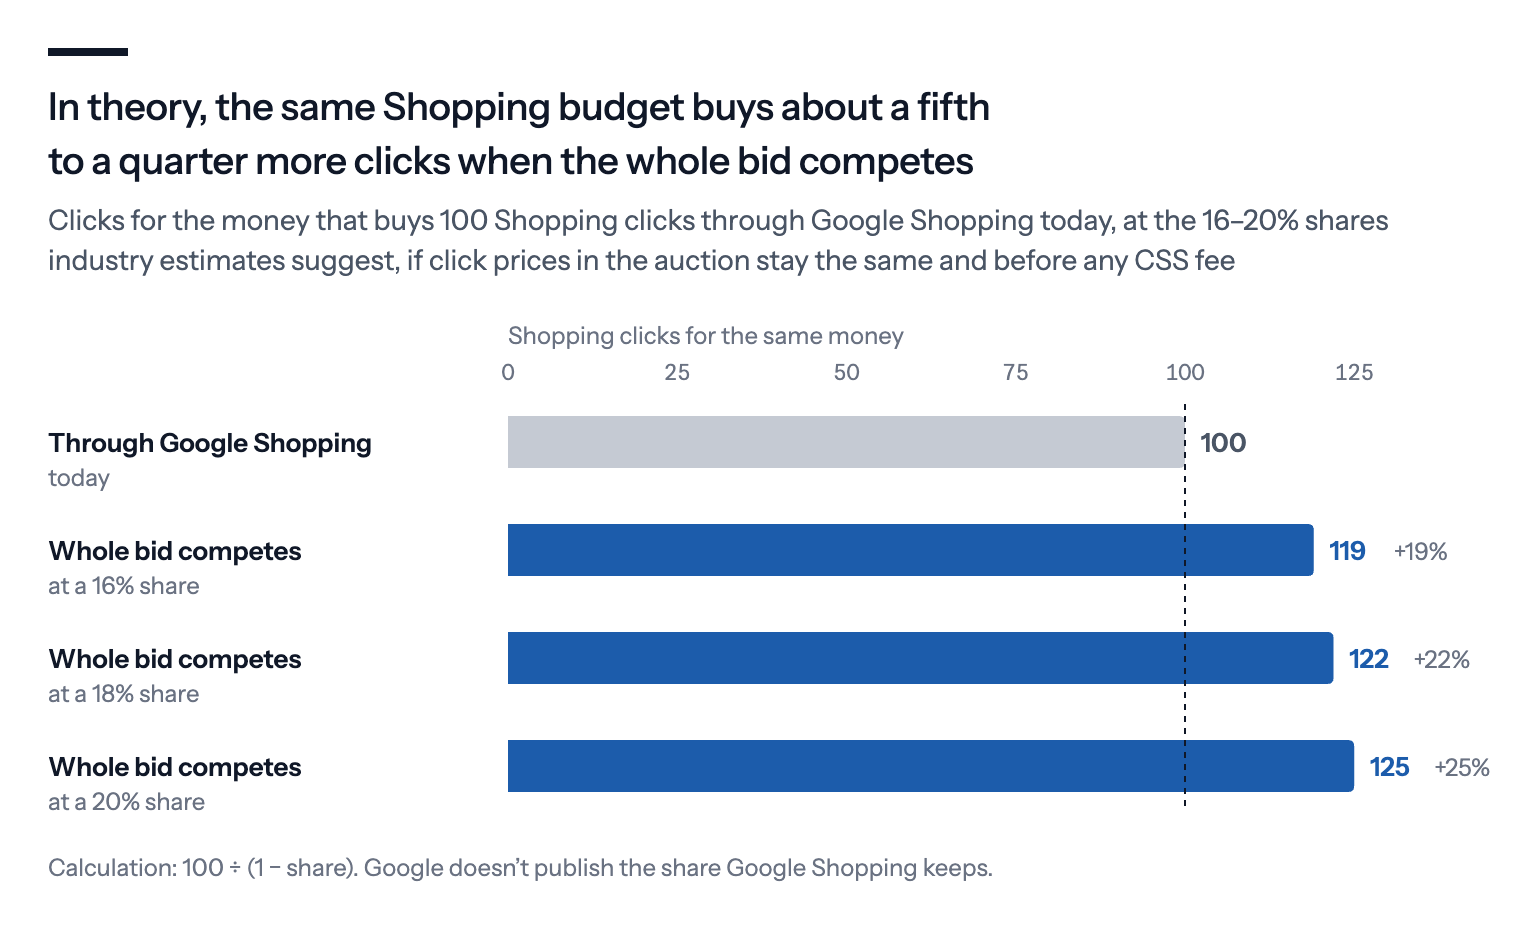
In practice, expect less than the arithmetic. Prices in the auction can rise as more of your competitors switch, and the saving shows up as more clicks and sales for the budget rather than a smaller bill. We explain the whole mechanism, and the EU antitrust case behind it, in What is CSS for Google Shopping ads?
What we'd do
- Create the Google Ads account without a campaign, add billing, write down the customer ID.
- Create Merchant Center, claim the site, set shipping and returns.
- Connect the feed with your shop's Google app or a feed URL.
- Link Merchant Center to Google Ads.
- Connect Bavian, set a budget, turn on Autopilot. Let it tell you what's missing.
- In Europe, move to Bavian's CSS.
Steps 1 to 4 are yours, once, and take about an hour. Bavian can't create a Google Ads account or a Merchant Center for you. Steps 5 and 6 take a few minutes, and after that the daily work is Bavian's.